2 releases
| new 0.1.1 | Apr 12, 2025 |
|---|---|
| 0.1.0 | Jan 6, 2025 |
#150 in Command line utilities
112 downloads per month
58KB
1K
SLoC
Typst Font Manager CLI
![]()
![]()
A CLI tool to manage fonts for Typst projects.
📦 Installation Methods
You can install this Typst Font Manager CLI named typfont using one of the following three methods:
1. Using cargo-binstall (Recommended)
cargo-binstall allows you to quickly download and install pre-compiled binaries.
-
Install
cargo-binstallif you haven’t already. -
Run the following command:
cargo binstall typst_font_manager
This method ensures you get the latest pre-built binary with minimal setup.
2. Manual Download
-
Visit the Releases Page.
-
Download the appropriate binary for your platform. You can choose either a compressed file or an uncompressed binary file.
-
Rename the binary to:
typfont(Linux/macOS)typfont.exe(Windows)
if you downloaded an uncompressed executable file.
-
Move the binary to a directory included in your system's
PATH.
3. Build from Source with cargo
If you prefer building from source, run:
cargo install typst_font_manager
This method requires Rust and Cargo to be installed on your system.
📄 Font Configuration for Typst Projects
To use this font manager CLI tool with your Typst project, place a font configuration file named font_config.toml in the same directory as your Typst file *.typ.
Below is an example font_config.toml file that explicitly specifies 5 fonts from 3 font families:
- Noto Sans (3 variants)
- Noto Sans Display (1 variant)
- STIXTwoText (1 variant)
font_dir = "fonts"

[[fonts]]
family_name = "Noto Sans"
style = "Normal"
weight = [400, 600, 700]

[[fonts]]
family_name = "Noto Sans Display"
style = "Normal"
weight = 500

[[fonts]]
family_name = "STIXTwoText"
style = "Italic"
weight = 400
Font Configuration Rules
-
Font Directory:
- Use
font_dir = "fonts"to specify the subdirectory where font files are stored. - If omitted, the default directory is
fonts.
- Use
-
Explicit Font Variants:
- The configuration explicitly specifies font variants instead of relying on a font family to map multiple variants automatically.
-
Font Family Naming:
- Ensure that the
family_namematches the names shown by thetypst fontscommand.
- Ensure that the
-
Weight Specification:
- Use an array like
[400, 600, 700]to specify multiple font weights explicitly.
- Use an array like
-
Default Style and Weight:
- If
styleis omitted, the default is"Normal". No fuzzy matching is applied. - If
weightis omitted, the default is400.
- If
🛠️ CLI Command Guide
The following steps outline how to explicitly set up font dependencies for your local Typst project by strictly specifying the font variants you want to use.
1 Identify Required Font Variants
- Start by determining the exact font variants your project needs.
- A handy tool for this is Tinymist. Open the command palette (
Ctrl+Shift+P) and search forsummary. - Click on
Typst: Show current document summary, and in the newly opened page, scroll down to view all fonts currently used in your Typst project. - Click the "book" icon in the top-right corner to access detailed information about each font, including:
- Family Name
- Style
- Weight
- First Occurrence Row Number
- Path to Font File
- In Typst, the combination of family name, style, and weight uniquely identifies a font variant. Use this information to select the precise variants for your project.
2 Create a Font Library
- Create a dedicated font library to store all fonts required across your Typst projects.
- While you can choose the system font directory, it’s often easier to maintain a separate directory for clarity.
- For example, create a directory at
/Users/goodguy/font_lib - Copy all the fonts you plan to use into this directory.
- Organize fonts by placing each family into its own subdirectory.
3 Verify Fonts in the Library
-
Remove any existing font files from your Typst project (consider backing them up first).
-
Run the following command:
cd path_to_your_typst_project typfont check -l "/Users/goodguy/font_lib" -
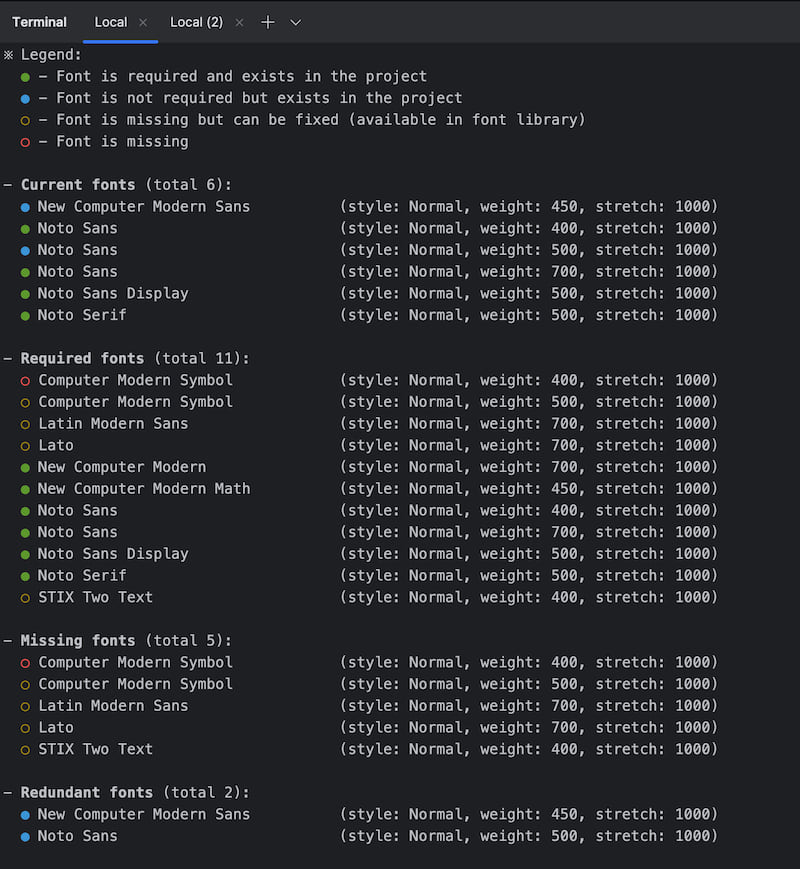
This command will display:
- Fonts required by your project.
- Fonts missing from your project, but available in your library.
- Fonts missing from your project, but unavailable in your library.
-
If all required fonts are present in the library, you’re good to proceed.
4 Update Project Fonts
- Run the following command to copy the required fonts from the library to your project’s configured font directory:
typfont update -l "/Users/goodguy/font_lib" - This ensures only the required fonts are copied to your project.
5 Final Verification
- Run the check command again to ensure nothing is missing:
typfont check -l "/Users/goodguy/font_lib" - The output should confirm that Missing fonts (total 0).
6 Ensure Explicit Font Management
To minimize unexpected font fallback and ensure strict font management, use the following command when compiling your Typst document:
typst compile foo.typ foo.pdf --ignore-system-fonts --font-path fonts
Additionally, add this line to your Typst file:
#set text(fallback: false)
This prevents Typst from falling back to unintended font variants, ensuring consistent and reproducible results across your project.
By following these steps, you'll have precise control over font management in your Typst projects, minimizing font-related issues and ensuring clarity in your setup.
🚀 GitHub CI Integration
If you want to avoid tracking numerous font files in your Typst project's GitHub repository, this CLI tool can help streamline the process.
1 Generate Font Library Information
- Use the following command to generate font library information:
typfont check-lib -l "/Users/goodguy/font_lib" -o - This should produce a file
font_library.tomlat the root path of your font library.
2 Create and Push Font Library Repository
- Make your local font library a Git repository.
- Push your local font library to a remote GitHub repository.
- Assume the following:
- GitHub Username:
gooduser - Font Library Repository Name:
font_lib
- GitHub Username:
3 Set Up GitHub Actions Workflow
-
In your GitHub Actions workflow, download the latest release of this CLI tool.
-
Run the following command to download fonts from your remote font library into your GitHub Actions worker:
typfont update -l "gooduser/font_lib" -g -
For reference, you can check one of my CI workflow examples: Example CI Workflow
Dependencies
~68MB
~1M SLoC