10 stable releases
Uses new Rust 2024
| 2.5.0 | Mar 16, 2025 |
|---|---|
| 2.4.0 | Jan 11, 2025 |
| 2.2.0 | Jun 23, 2024 |
| 2.1.0 | Jan 27, 2024 |
| 2.0.0 | Sep 30, 2023 |
#15 in Games
140 downloads per month
420KB
16K
SLoC
MinedMap
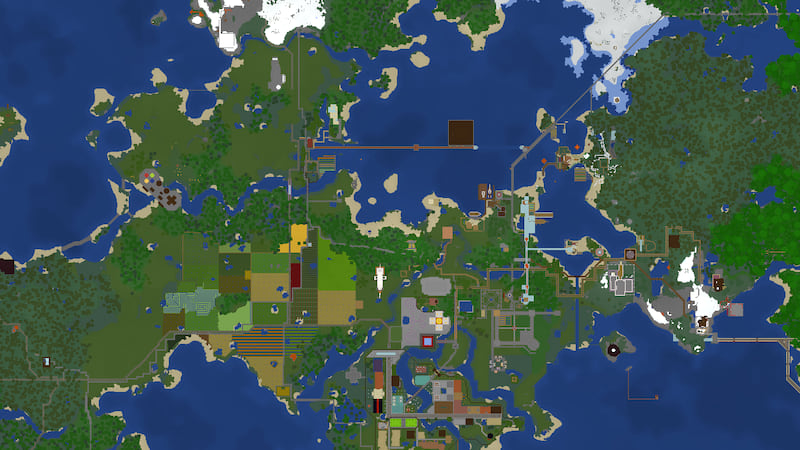
- Render beautiful maps of your Minecraft worlds!
- Put them on a webserver and view them in your browser!
- Compatible with unmodified Minecraft Java Edition 1.8 up to 1.21.4 (no mod installation required!)
- Illumination layer: the world at night
- Fast: create a full map for a huge 3GB savegame in less than 5 minutes in single-threaded operation
- Multi-threading support: pass
-j Nto the renderer to useNparallel threads for generation - Incremental updates: only recreate map tiles for regions that have changed
- Typically uses less than 100MB of RAM in single-threaded operation (may be higher when
-jis passed) - Cross-platform: runs on Linux, Windows, and likely other systems like MacOS as well

About
MinedMap consists of two components: a map renderer generating map tiles from Minecraft save games, and a viewer for displaying and navigating maps in a browser based on Leaflet. The map renderer is heavily inspired by MapRend, but has been reimplemented from scratch (first in C++, now in Rust) for highest performance.
How to use
Download the binary release that matches your platform from the Github release
page (or install from source using cargo), as well as the platform-independent
viewer archive. Extract the viewer archive. The extracted directory contains the
HTML and JavaScript to operate the viewer and will be made publicly accessible
on a web server. The image data generated by MinedMap will be stored in the
data subdirectory of the extracted viewer.
Minecraft stores its save data in a directory ~/.minecraft/saves on Linux,
and C:\Users\<username>\AppData\Roaming\.minecraft\saves. To generate MinedMap
tile data from a save game called "World", use the a command like the following
(replacing the first argument with the path to your save data; <viewer> refers
to the directory where you unpacked the MinedMap viewer):
minedmap ~/.minecraft/saves/World <viewer>/data
The first map generation might take a while for big worlds, but subsequent calls will only rebuild tiles for region files that have changed, rarely taking more than a second or two. This makes it feasible to update the map very frequently, e.g. by running MinedMap as a Cron job every minute.
Note that it is not possible to open the viewer index.html without a webserver, as
it cannot load the generated map information from file:// URIs. For testing purposes,
you can use a minimal HTTP server, e.g. if you have Python installed just run the
following in the viewer directory:
python3 -m http.server
This test server is very slow and cannot handle multiple requests concurrently, so use a proper webserver like nginx or upload the viewer together with the generated map files to public webspace to make the map available to others.
If you are uploading the directory to a remote webserver, you do not need to upload the
<viewer>/data/processed directory, as it is only used locally to allow processing
updates more quickly.
Image formats
MinedMap renders map tiles as PNG by default. Pass --image-format webp to select
WebP instead. For typical Minecraft worlds, using WebP reduces file sizes by 20-25%
without increasing processing time.
MinedMap always uses lossless compression for tile images, regardless of the image format.
Signs

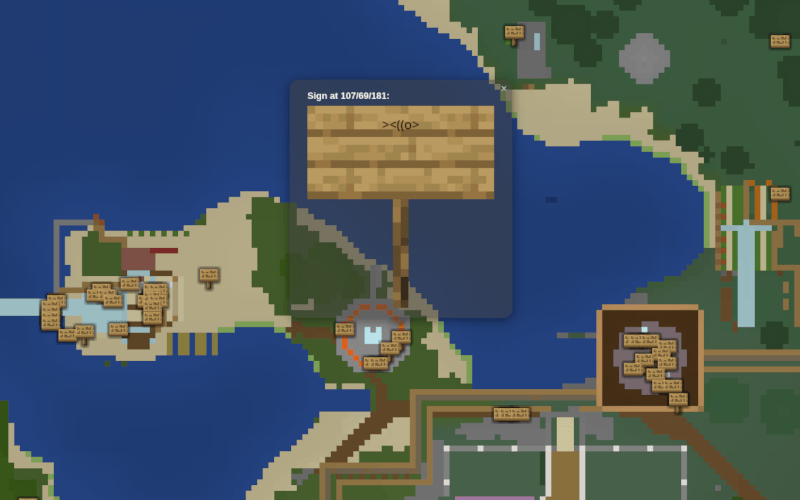
MinedMap can display sign markers on the map, which will open a popup showing the sign text when clicked.
Generation of the sign layer is disabled by default. It can be enabled by passing
the --sign-prefix or --sign-filter options to MinedMap. The options allow
to configure which signs should be displayed, and they can be passed multiple
times to show every sign that matches at least one prefix or filter.
--sign-prefix will make all signs visible the text of which starts with the
given prefix, so something like --sign-prefix '[Map]' would allow to put up
signs that start with "[Map]" in Minecraft to add markers to the map. An
empty prefix (--sign-prefix '') can be used to make all signs visible on
the map.
--sign-filter can be used for more advanced filters based on regular expressions.
--sign-filter '\[Map\]' would show all signs that contain "[Map]"
anywhere in their text, and --sign-filter '.' makes all non-empty signs (signs
containing at least one character) visible. See the documentation of the
regex crate for more information on the supported syntax.
All prefixes and filters are applied to the front and back text separately, but both the front and the back text will be shown in the popup when one of them matches.
Finally, --sign-transform allows to specify sed-style replacement patterns to
modify the text displayed on the map. This can be used if the text matched by
--sign-prefix or --sign-filter should not be displayed:
--sign-transform 's/\[Map\]//' would replace each occurence of "[Map]" with
the empty string.
Note: On Windows, double quotes (") must be used for arguments instead
of single quotes ('), and all backslashes in the arguments must be escaped
by doubling them. This can make regular expressions somewhat difficult to
write and to read.
Installation
Binary builds of the map generator for Linux and Windows, as well as an archive containing the viewer can be found on the GitHub release page.
Building the generator from source requires a recent Rust toolchain (1.72.0 or newer). The following command can be used to build the current development version:
cargo install --git 'https://github.com/neocturne/MinedMap.git'
If you are looking for the older C++ implementation of the MinedMap tile renderer, see the v1.19.1 tag.
Dependencies
~24–38MB
~675K SLoC